8 Essential Lighting Setups for Headshots You Need to Master in 2026
The difference between a forgettable selfie and a professional headshot that commands attention often comes down to one crucial element: light. Understanding how to shape and control it is the single most powerful skill for capturing compelling portraits. The best lighting setups for headshots don't just illuminate a subject; they sculpt facial features, define mood, and convey a specific, intentional message.
Whether you're aiming for a classic corporate look, a soft and approachable vibe, or a dramatic artistic portrait, the right setup can completely transform your subject’s presence on screen and in print. A well-placed key light can create depth, while a subtle fill light can soften shadows for a more flattering result. Each configuration tells a different story, and knowing which one to choose is fundamental to achieving professional-grade images.
In this comprehensive guide, we will break down eight essential and versatile lighting setups for headshots. You will find clear diagrams, gear recommendations, and step-by-step instructions for each one. We'll cover everything from the foundational Three-Point Lighting to the cinematic Rembrandt and the universally flattering Clamshell.
Furthermore, we'll explore how modern AI tools like PhotoMaxi are revolutionizing this process. These tools empower creators to fine-tune or completely relight headshots in post-production, offering unprecedented control and consistency. This makes achieving perfect, on-brand lighting for entire teams more accessible than ever, bridging the gap between a simple photoshoot and a polished, professional final product. Let's dive into the techniques that will elevate your headshot photography from standard to stunning.
1. Classic Three-Point Lighting
Classic three-point lighting is the bedrock of professional portraiture and one of the most essential lighting setups for headshots you can master. It uses three distinct light sources to shape, define, and separate your subject, creating a polished and dimensional image that looks clean and professional. This technique offers complete control over highlights and shadows, making it a versatile choice for everything from corporate directories to actor portfolios.
How It Works
This setup involves a strategic placement of three lights: the Key Light, the Fill Light, and the Back Light. Each has a specific job in sculpting the final look.
- Key Light: This is your main and most powerful light source. It's typically placed at a 45-degree angle to the subject and positioned slightly above eye level. The key light establishes the primary illumination and creates the main shadows, defining the subject's facial features.
- Fill Light: Positioned on the opposite side of the key light, the fill light "fills in" the shadows created by the key light. Its intensity is lower than the key, which prevents the lighting from looking flat. The goal is to soften shadows, not eliminate them entirely.
- Back Light (or Hair Light/Rim Light): Placed behind the subject, often elevated, this light separates them from the background. It creates a subtle, glowing outline around the hair and shoulders, adding depth and preventing the subject from blending into the backdrop.
When to Use This Setup
This is the go-to setup for achieving a universally professional and flattering look. It's highly effective for:
- Corporate and executive portraits
- Actor and talent agency headshots
- High-end personal branding for entrepreneurs
- LinkedIn profile pictures that need to convey professionalism
Tips for Implementation
- Mind Your Ratios: The brightness relationship between your key and fill lights (the lighting ratio) dictates the mood. A 2:1 ratio (key is twice as bright as fill) is standard for a clean corporate look. A higher ratio, like 4:1 or 8:1, creates more dramatic, high-contrast results.
- Feather the Light: Aim your key light so the edge of its beam (the "feather") illuminates the subject's face. This provides softer, more flattering light than a direct blast.
- Use Reflectors: If you only have two lights, you can use a white or silver reflector in place of a fill light to bounce some of the key light back onto the shadow side of the face.
PhotoMaxi Pro-Tip: Don't have the perfect three-point setup? With PhotoMaxi's AI relighting tools, you can upload a single-source image and digitally add fill and rim lights post-production. This allows you to experiment with different ratios and achieve a perfect three-point look without complex on-set gear. For more insights into studio setups, explore these tips on creating the ideal professional studio portrait.
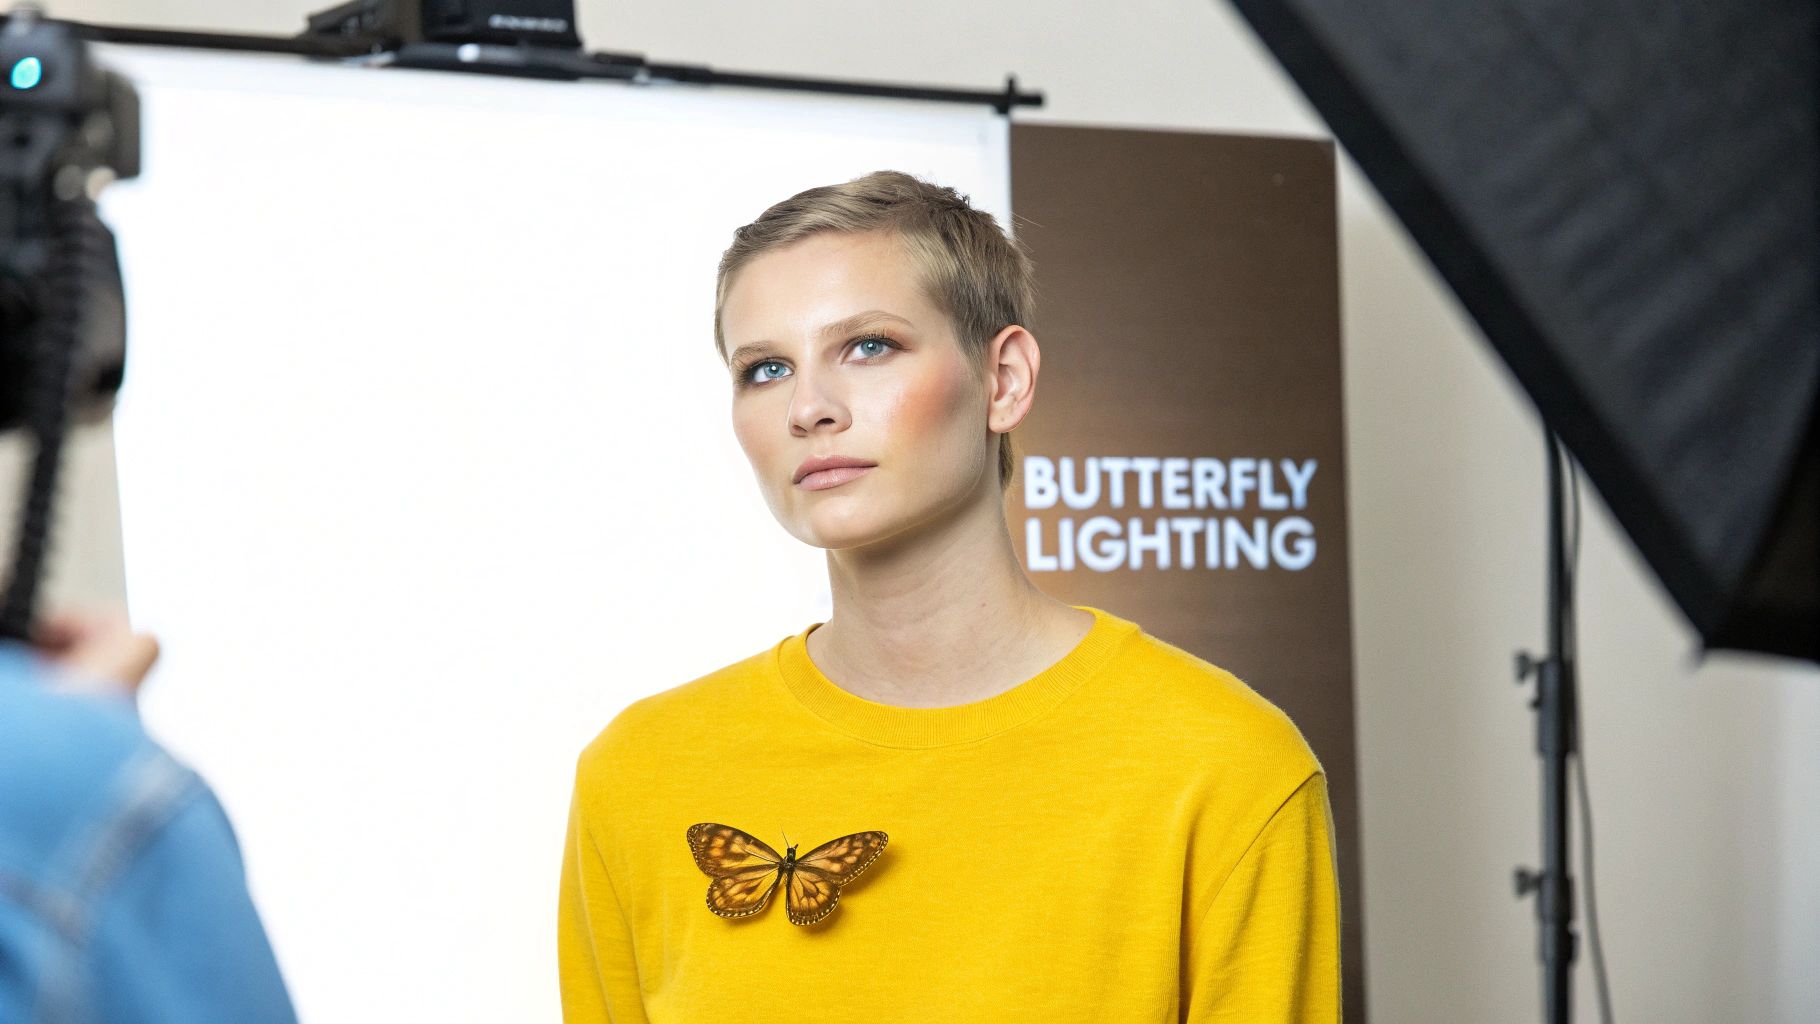
2. Butterfly Lighting (Paramount Lighting)
Butterfly lighting, also known as Paramount lighting, is a classic glamour setup prized for its ability to create sculpted, symmetrical, and flattering portraits. This technique is one of the most elegant lighting setups for headshots, defined by the small, butterfly-shaped shadow it casts directly beneath the subject's nose. Popularized during the golden age of Hollywood, it remains a favorite for fashion, beauty, and any headshot intended to convey polish and sophistication.
How It Works
This setup is deceptively simple, relying primarily on a single main light source placed high and centered in front of the subject. Often, a reflector or a secondary fill light is used below to soften shadows.
- Key Light: The key light is placed directly in front of and above the subject, angled down towards their face. This high, central placement is what creates the signature shadow under the nose and accentuates the cheekbones.
- Fill Light or Reflector: A reflector or a low-powered fill light is positioned directly below the subject's chin, often held by the subject or placed on a low stand. Its purpose is to bounce light back up, softening the shadows under the chin and nose for a cleaner, more radiant look.
When to Use This Setup
Butterfly lighting is ideal for creating a high-impact, glamorous, and often timeless image. It is particularly effective for:
- Instagram influencer and creator headshots
- Beauty and fashion photography
- High-end social media profile pictures
- Actor headshots for roles requiring a sophisticated look
Tips for Implementation
- Find the Shadow: The key is the butterfly shadow. Adjust the height of your key light until the shadow is present but doesn't touch the upper lip. If it's too long, your light is too low; if it's gone, your light is too high.
- Direct Gaze: This setup works best when the subject faces directly toward the camera, as turning the head can distort the symmetrical shadow pattern.
- Modifier Choice: A large, soft light source like a beauty dish or a softbox creates a more flattering and gentle light. A beauty dish, in particular, will give you soft light with a bit more definition than a standard softbox.
PhotoMaxi Pro-Tip: Butterfly lighting creates a distinct look that might not suit every face shape. With PhotoMaxi's AI, you can capture a simple, flatly-lit portrait and digitally reposition the key light to simulate a perfect butterfly setup. This allows you to test if the high-angle light flatters your subject before committing to it on set. For a deeper dive into different arrangements, review this detailed guide on the best light setup for headshots.
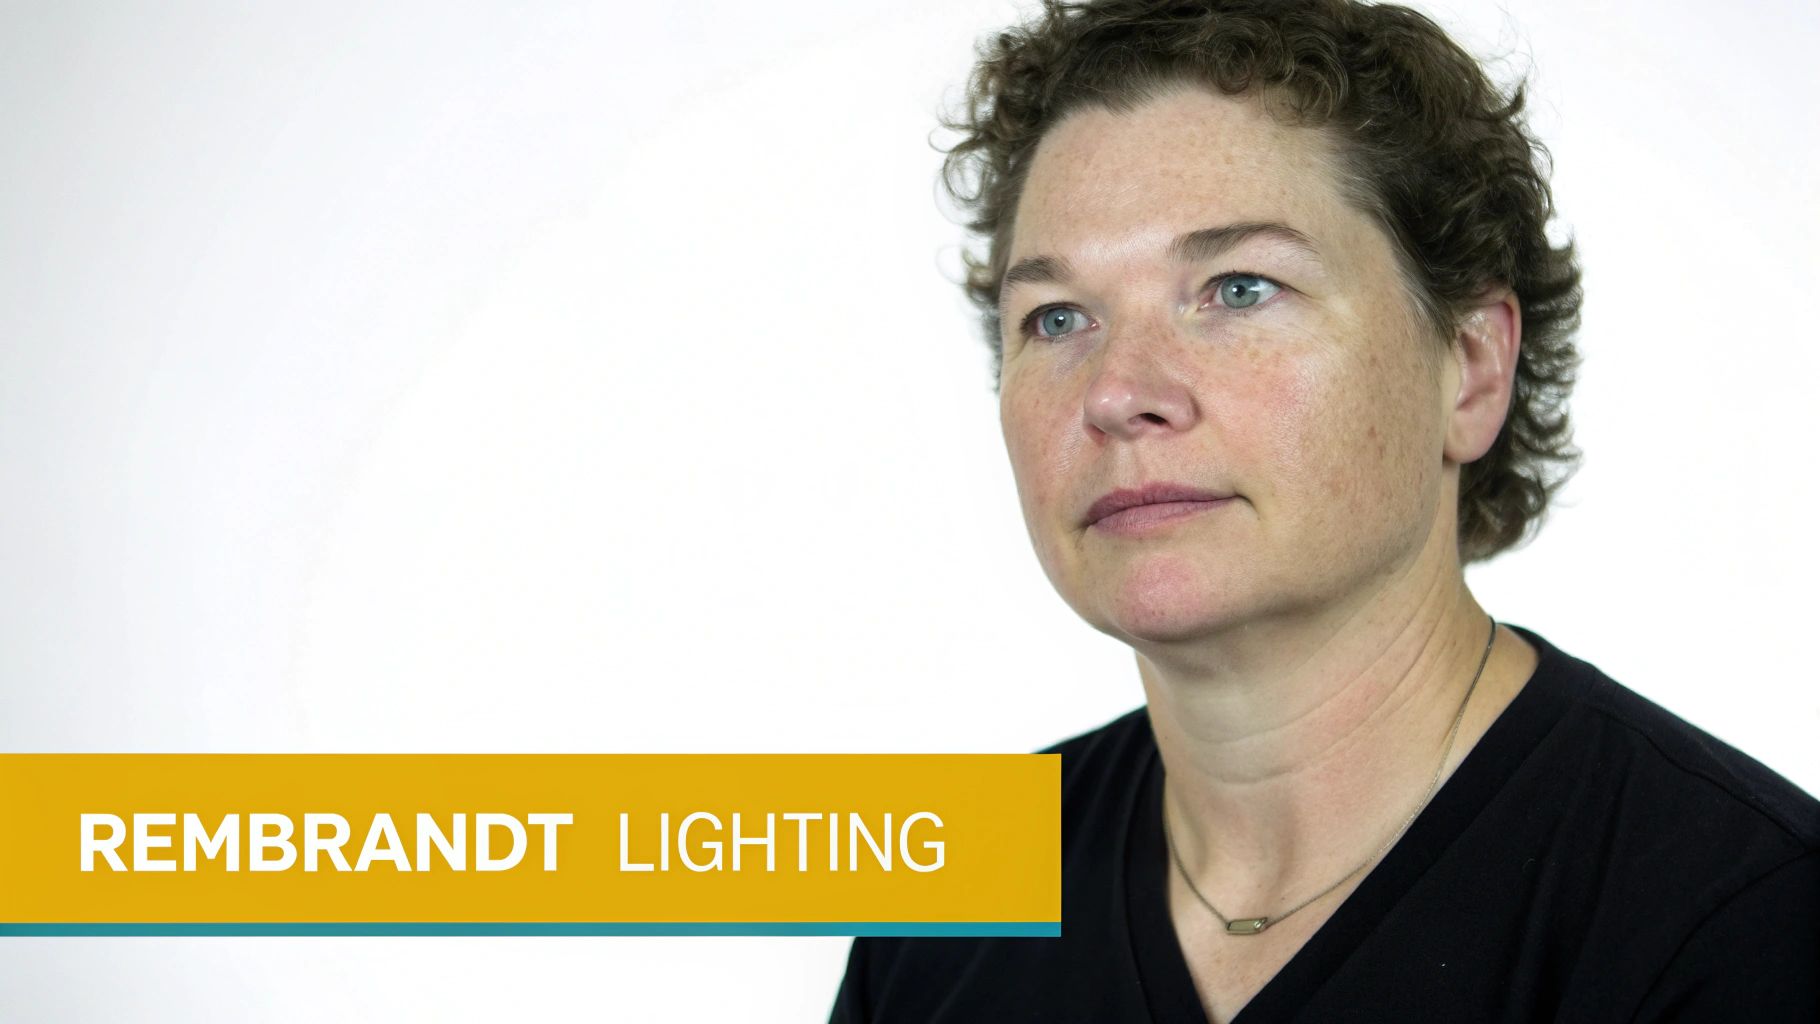
3. Rembrandt Lighting
Named after the iconic Dutch painter, Rembrandt lighting is one of the most classic and artistic lighting setups for headshots. It’s revered for its ability to create a sense of depth, mood, and dimensionality by sculpting the face with a distinctive play of light and shadow. The tell-tale sign of this technique is a small, inverted triangle of light on the subject's cheek on the less illuminated side of the face.
How It Works
This moody and dramatic effect is achieved by carefully positioning a single key light. The light is placed high and to the side of the subject, creating a shadow from the nose that connects with the shadow on the cheek.
- Key Light: Position your main light source at approximately a 45-degree angle to your subject and raise it high enough so it's pointing down at about a 45-degree angle. This high-angle placement is crucial for creating the signature shadow pattern.
- The Triangle: The light should be positioned so the shadow of the subject’s nose extends down towards the corner of their mouth. This creates the "Rembrandt triangle" of light on the cheek just below the eye.
- Fill Light/Reflector (Optional): While true Rembrandt lighting can be achieved with one light, a fill light or a reflector can be used on the opposite side to gently lift the shadows. The key is to keep the fill intensity very low to preserve the dramatic, high-contrast look.
When to Use This Setup
Rembrandt lighting adds a sophisticated and painterly quality, making it ideal for portraits that need to convey character and drama. It’s perfect for:
- Actors and entertainers needing emotive, character-driven headshots
- Artists, writers, and musicians seeking an artistic portrait
- Corporate headshots for executives in creative or serious fields
- Personal branding photos that aim for a timeless, classic feel
Tips for Implementation
- Watch the Triangle: The size and shape of the light triangle are key. It should not be wider than the subject's eye or longer than their nose for the classic effect.
- Adjust Subject's Pose: Have your subject turn their face slightly away from the key light. Small adjustments in their head position will dramatically change the shadow and the triangle's placement. Posing is crucial here, and you can explore more techniques with these professional photoshoot poses.
- Use Soft Light: A softbox or an umbrella is essential to create soft-edged shadows that blend beautifully on the face, which is more flattering than the harsh lines from a bare bulb.
PhotoMaxi Pro-Tip: Achieving the perfect Rembrandt triangle on set can be tricky. With PhotoMaxi's AI relighting, you can take a well-exposed but flatly lit image and reposition a digital light source to create that perfect, moody shadow. This allows you to fine-tune the triangle's position and intensity in post-production, guaranteeing a flawless, artistic result every time.
4. Loop Lighting
Loop lighting is a highly popular and flattering technique that strikes a perfect balance between the broad illumination of three-point lighting and the dramatic shadows of Rembrandt lighting. This is one of the most versatile lighting setups for headshots because it adds dimension and character without being overly stylized. It is defined by a small, downward-pointing "loop" of shadow on the side of the nose, which elegantly sculpts the face while maintaining a natural and approachable feel.
How It Works
Loop lighting is primarily achieved with a single key light, though a fill light or reflector is often added to control shadow depth. The placement of the main light is crucial to creating the signature nose shadow.
- Key Light: This light is placed approximately 30 to 45 degrees to the side of the camera and positioned slightly above the subject's eye level. The height and angle are adjusted until a small shadow appears on the side of the nose, pointing down towards the corner of the mouth. The loop shadow should not connect with the cheek shadow.
- Fill Light (Optional): To soften the shadows and control the mood, a fill light or a reflector can be placed on the opposite side of the key light. The intensity should be lower than the key to preserve the facial contours created by the loop shadow. A common lighting ratio for this setup is 3:1.
When to Use This Setup
This setup is a forgiving and universally flattering choice that works well for almost any face shape. It's a professional standard for:
- Corporate team photography and LinkedIn profiles
- Real estate agent and professional service headshots
- YouTube channel creator and personal branding portraits
- E-commerce model shots where approachability is key
Tips for Implementation
- Adjust for the Loop: The key is to watch the nose shadow. If the key light is too high, the shadow will be too long. If it's too far to the side, the shadow will cross the face and become Rembrandt lighting.
- Mind the Fill Ratio: Use a fill light or reflector at a moderate intensity (a 3:1 or 4:1 ratio is ideal). This retains detail in the shadows without making the image look flat.
- Direct the Gaze: The subject can look either toward or away from the key light. Looking towards the light creates a classic, open look, while looking away can add a touch of introspection or drama.
- Works with Most Faces: This technique is a reliable starting point because it complements a wide variety of facial structures, making it perfect for high-volume headshot sessions.
PhotoMaxi Pro-Tip: Getting the loop shadow just right can be tricky on set. With PhotoMaxi's AI relighting, you can fine-tune the key light's position and intensity in post-production. Simply upload your image and use the directional lighting tool to create the perfect loop, ensuring consistent, professional results across an entire team’s headshots.
5. Split Lighting
Split lighting is a bold and dramatic technique that stands out among classic lighting setups for headshots. This high-contrast approach creates a powerful, theatrical effect by illuminating exactly half of the subject’s face while leaving the other half in deep shadow. It’s a method used to evoke mystery, intensity, and artistic flair, making it perfect for portraits that need to make a strong statement.
How It Works
The setup is deceptively simple but requires precision. A single key light is positioned at a 90-degree angle to the subject, directly to their side. This placement is what creates the distinct dividing line of light and shadow down the center of the face.
- Key Light: This is the primary and often only significant light source. It is placed at a perfect 90-degree angle to the subject’s face, at or slightly above eye level. The goal is to light one half of the face completely while the other half falls into shadow.
- Fill Light (Optional): In a traditional split lighting setup, a fill light is often omitted to maximize the dramatic contrast. If used, it should be set to a very low power to introduce minimal detail into the shadows, maintaining the moody aesthetic.
- Back Light (Optional): A back light can be used to add separation from the background. It creates a crisp rim of light on the shadowed side of the subject, preventing them from disappearing into a dark backdrop and adding a professional polish.
When to Use This Setup
Split lighting is not for every situation; its strength lies in its ability to convey a specific mood or character. It is highly effective for:
- Musician headshots and album cover art
- Actor headshots for dramatic or intense character roles
- Fashion editorials and artistic portfolio pieces
- Brand campaigns that require a bold, edgy, and confident look
Tips for Implementation
- Achieve the Perfect 90-Degree Angle: The key to a true split is precise placement. Position the light directly to the side of your subject, ensuring the light doesn't spill over the bridge of their nose onto the other cheek.
- Maximize Drama: For the most dramatic effect, use a high lighting ratio like 8:1 or even higher. This means your key light is at least eight times brighter than any ambient or fill light, creating deep, rich shadows.
- Direct Your Subject: Instruct your subject to look directly into the camera. Turning their head even slightly will alter the line of shadow and change the effect from a split light to a variation of Rembrandt or loop lighting.
- Use a Grid: Attaching a honeycomb grid to your light source (like a softbox or reflector) will narrow the beam and prevent light from spilling onto the background, creating a more focused and controlled effect.
PhotoMaxi Pro-Tip: Split lighting can be difficult to perfect in-camera. If your on-set shot isn’t quite right, PhotoMaxi's AI relighting can save the day. Upload your image and use the AI tools to digitally position a light source at a perfect 90-degree angle, allowing you to create that flawless, dramatic split effect in post-production with just a few clicks. Learn more about enhancing your portraits by exploring our guide on creating the perfect AI headshot.
6. Broad and Short Lighting
Unlike a specific setup, broad and short lighting are foundational principles that describe how light falls on the face relative to the camera. Mastering these two approaches is one of the most powerful ways to flatter different face shapes and is a key skill in creating versatile lighting setups for headshots. Broad lighting illuminates the side of the face turned toward the camera, creating a wider look, while short lighting illuminates the side turned away, which has a slimming, sculpting effect.
How It Works
These techniques aren't about adding more lights; they are about the interplay between your key light, your subject's pose, and the camera's perspective. The same key light placement can produce either effect based on which way the subject turns their head.
- Broad Lighting: The subject turns their face slightly away from the key light. This causes the side of the face closest to the camera (the "broad" side) to be fully illuminated, placing the shadowed side further from the lens. This technique minimizes texture and creates a bright, open feel.
- Short Lighting: The subject turns their face slightly toward the key light. This illuminates the side of the face further from the camera (the "short" side). The side closer to the camera falls partially into shadow, which adds depth, dimension, and has a narrowing effect on the face.
When to Use This Setup
Choosing between broad and short lighting depends entirely on the subject's facial structure and the desired mood.
- Broad Lighting is ideal for:
- Subjects with narrow faces who want to appear fuller.
- Creating a high-key, friendly, and approachable look for personal branding.
- Minimizing skin texture or wrinkles for a softer portrait.
- Short Lighting is ideal for:
- Subjects with round or wide faces who desire a more sculpted, slimming effect.
- Creating a dramatic, moody, or classic portrait with more depth.
- Accentuating cheekbones and jawlines for a chiseled look.
Tips for Implementation
- Pivot, Don't Move: The easiest way to switch between broad and short lighting is to have your subject pivot their head slightly. Keep your key light and camera in the same position.
- Combine with Other Patterns: Broad and short lighting are not standalone setups. They are modifiers you apply to other patterns like Loop, Rembrandt, or Butterfly lighting to enhance their effect.
- Watch for Hot Spots: In broad lighting, be careful that the illuminated cheek closest to the camera doesn't become overexposed. Adjust your light's intensity or feather it to maintain detail.
- Master the Eye-Catch: In short lighting, ensure the eye on the shadow side of the face still has a catchlight. This brings life to the portrait and prevents the eye from looking dark and flat.
PhotoMaxi Pro-Tip: Experimenting with broad and short lighting during a shoot can be time-consuming. With PhotoMaxi's AI relighting, you can take one well-lit shot and then digitally shift the key light's emphasis to simulate either a broad or short pattern. This is perfect for generating multiple looks for a casting portfolio or A/B testing headshots for a corporate team. For more on achieving flattering portraits, see our guide on AI-driven facial feature adjustments.
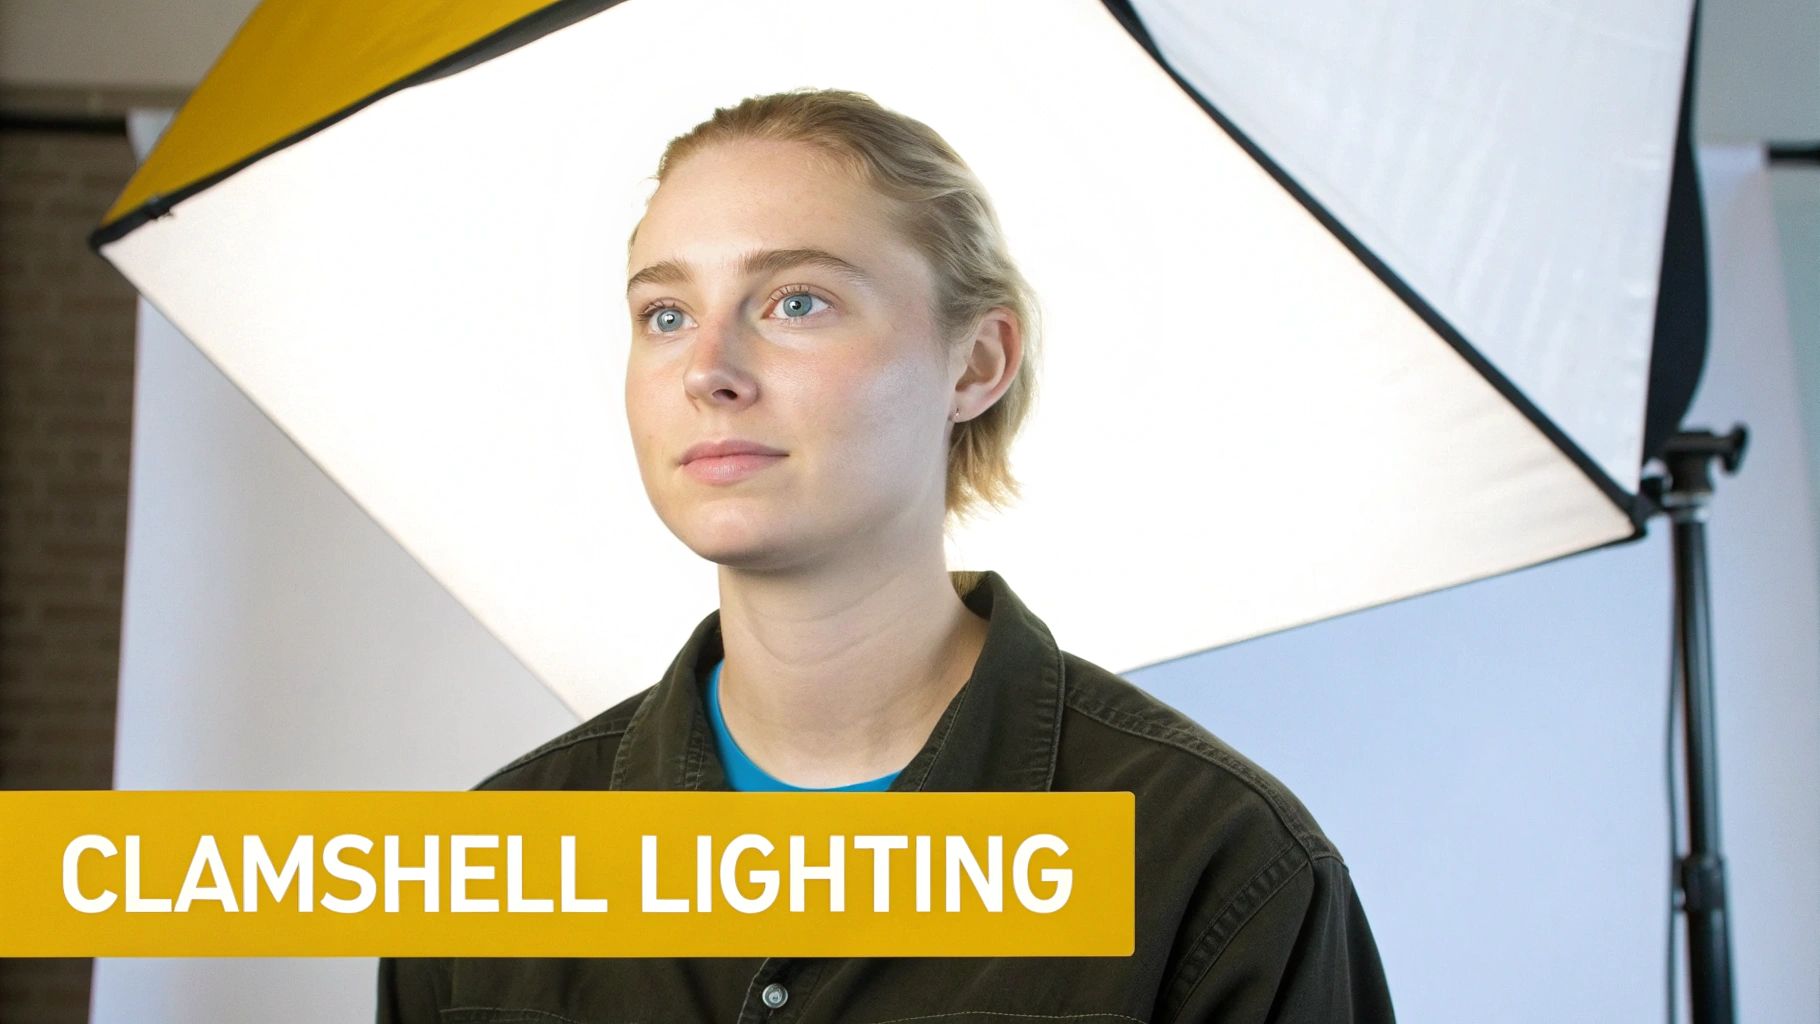
7. Clamshell Lighting (Ring Light Setup)
Clamshell lighting is a beauty-focused technique renowned for creating soft, even illumination that minimizes blemishes and wrinkles. It wraps the subject's face in light from above and below, virtually eliminating harsh shadows and producing a signature catchlight in the eyes. While traditionally done with two softboxes, its modern iteration frequently uses a single ring light, making it one of the most accessible lighting setups for headshots for content creators and online personalities.
How It Works
This setup gets its name from its physical arrangement, which resembles an open clamshell. Two light sources are positioned in front of the subject, creating a cocoon of soft light that beautifully flatters the skin.
- Main Light: The primary light source is placed directly in front of and slightly above the subject's eye line, angled down. In modern setups, this is often a ring light that the camera shoots through.
- Fill Light: A second light source or a reflector is placed directly below the subject's face, angled up. This "fills" in any subtle shadows under the chin and nose, ensuring exceptionally even coverage. The power of this fill is typically lower than the main light to avoid an unnatural look.
When to Use This Setup
Clamshell lighting is the top choice for any shot where flawless skin and a clean, modern aesthetic are the priority. It excels in:
- Beauty, makeup, and skincare tutorials
- YouTube and TikTok creator headshots
- Instagram influencer content and lifestyle posts
- Ecommerce model photography for fashion and cosmetics
- Polished headshots for virtual meetings or online profiles
Tips for Implementation
- Ring Light Placement: Position your ring light about 2-3 feet from the subject, centered at eye level. This distance is close enough for the light to wrap but far enough to avoid distortion.
- Create the "Clam": If using a single ring light, place a white foam core board or a silver reflector on the subject's lap, angled up toward their face. This will bounce light back up, filling in shadows and completing the clamshell effect.
- Even Illumination: Ensure the subject is equidistant from all sides of the ring light to achieve balanced, symmetrical catchlights in their eyes.
- Softer is Better: This technique relies on soft, diffused light. If your light source feels too harsh, add a layer of diffusion material or move it slightly farther away to soften its impact.
PhotoMaxi Pro-Tip: The hallmark of clamshell lighting is its shadowless quality. PhotoMaxi's AI can analyze a headshot and use its "Smooth Skin" feature to further enhance the blemish-reducing effect of this setup, creating a perfectly polished, magazine-quality finish. Learn how to refine your portraits by exploring our guide on creating professional AI headshots.
8. Window Light (Natural Side Lighting)
Sometimes the most effective lighting setups for headshots don't require expensive strobes or modifiers. Window light offers a beautiful, soft, and natural illumination that is hard to replicate artificially. This technique harnesses the power of a large window as the primary light source, creating gentle shadows and incredibly flattering light that feels authentic and warm. It is the perfect setup for producing approachable and genuine headshots with minimal equipment.
How It Works
This setup uses a large window as a massive softbox. The subject is positioned near the window, allowing the diffused natural light to illuminate one side of their face, creating a classic short or broad lighting pattern depending on their position relative to the camera.
- Key Light: The window itself acts as the main light source. The size and proximity of the window determine the softness of the light. A larger, closer window will produce softer light and gentler shadow transitions.
- Fill Source (Optional): To manage the shadows on the side of the face opposite the window, a reflector is typically used. A white foam board or a 5-in-1 reflector can be positioned to bounce the window light back into the shadows, brightening them subtly.
- Background: The background can be the room itself for a lifestyle feel or a simple backdrop placed strategically to avoid distracting elements. The key is to ensure the subject is well-separated and remains the focus.
When to Use This Setup
This approach is ideal for headshots that need to feel personal, authentic, and warm. It excels in scenarios where a corporate or studio look would feel too stiff. Consider it for:
- Personal branding for coaches, authors, and consultants
- Authentic lifestyle and wellness content
- Headshots for real estate agents or small business owners
- Any portrait requiring a natural and approachable feel
Tips for Implementation
- Timing is Everything: The best light is typically within 2-4 hours of sunrise or sunset. Avoid direct, harsh midday sun, which can create unflattering hot spots and deep shadows.
- Position for Softness: Place your subject about 3-6 feet from the window. Turning them at a 45-degree angle to the window often creates the most pleasing side lighting.
- Use a Reflector: A simple white reflector placed opposite the window is crucial for balancing the light. It fills in shadows naturally without needing an additional flash.
- Control the Light: If direct sun is unavoidable, diffuse it by hanging a sheer white curtain over the window. This transforms the harsh light into a large, soft source.
PhotoMaxi Pro-Tip: Captured the perfect pose by the window but the shadows are too deep or the light is too cool? PhotoMaxi’s AI tools can fix it. Adjust the lighting balance, warm up the color temperature, or even enhance the "golden hour" glow in post-production. You can achieve a flawless natural light look, regardless of the conditions you shot in. For more on creating consistent looks, check out our guide on achieving on-brand headshots.
8 Headshot Lighting Setups Compared
| Technique | Implementation complexity (🔄) | Resource requirements (⚡) | Expected outcomes (⭐/📊) | Ideal use cases (📊) | Key advantages (💡) |
|---|---|---|---|---|---|
| Classic Three-Point Lighting | 🔄 Moderate–High — precise positioning and ratios | ⚡ 3 lights, stands, modifiers; studio space | ⭐⭐⭐⭐ — polished, dimensional portraits with clear subject separation | Corporate headshots, professional portraits, actor portfolios | 💡 Full control of shadows/highlights; highly reproducible |
| Butterfly Lighting (Paramount) | 🔄 Low — simple central key placement | ⚡ 1 key (+ optional fill); minimal gear | ⭐⭐⭐ — glamorous, high-impact frontal look with subtle nose shadow | Beauty/fashion headshots, influencers, social media profiles | 💡 Flattering, recognizable aesthetic with fewer lights |
| Rembrandt Lighting | 🔄 High — precise angle for the triangle catchlight | ⚡ 1–2 lights, modifiers; skilled positioning | ⭐⭐⭐⭐ — dramatic, editorial depth and strong modeling | Actor casting, editorial portraits, artistic branding | 💡 Creates cinematic mood and character-driven intensity |
| Loop Lighting | 🔄 Low–Moderate — flexible angle adjustments | ⚡ 1–2 lights; moderate setup time | ⭐⭐⭐ — natural-looking dimension, subtle nose shadow | LinkedIn headshots, corporate teams, e‑commerce/product images | 💡 Versatile and forgiving across face shapes; consistent results |
| Split Lighting | 🔄 Moderate — requires exact 90° placement | ⚡ 1 key light; minimal fill recommended | ⭐⭐⭐ — high-contrast, bold and theatrical images | Music/fashion editorials, character portraits, album art | 💡 Distinctive, memorable look that conveys intensity |
| Broad & Short Lighting | 🔄 Low — change by rotating subject, not lights | ⚡ No extra gear; use with any key setup | ⭐⭐–⭐⭐⭐ — subtle change to perceived face width/shape | Multiple-look sessions, casting variations, client-specific tweaks | 💡 Quick, cost-effective way to alter face proportions |
| Clamshell Lighting (Ring Light) | 🔄 Low — symmetric above/below placement | ⚡ 1 ring or 2 softboxes; simple modifiers | ⭐⭐⭐ — soft, even, low-shadow aesthetic ideal for skin detail | Beauty influencers, YouTube creators, ecommerce/Shopify | 💡 Minimizes blemishes; produces bright, social-media-friendly images |
| Window Light (Natural Side) | 🔄 Low — easy setup but variable control | ⚡ Minimal — natural light + reflector; low cost | ⭐⭐⭐ — warm, natural, flattering but less consistent | Solopreneurs, lifestyle branding, authentic portraits | 💡 Cost-effective, approachable look; great for authentic storytelling |
From Setup to Scale: Your Next Steps in Headshot Mastery
You’ve explored eight foundational lighting setups for headshots, each with a distinct character and purpose. From the dramatic chiaroscuro of Rembrandt and Split Lighting to the universally flattering glow of Butterfly and Clamshell setups, you now possess the technical blueprint to shape light and, by extension, shape perception. This is the core of photographic mastery: understanding not just how to place a light, but why you are placing it there.
The journey from novice to expert is paved with practice. The true test of your knowledge isn't just knowing the difference between Loop and Rembrandt lighting; it's recognizing which one will best serve your client's brand, whether they are a tech CEO needing a look of confident authority or a creative professional seeking an approachable, warm portrait. Each setup is a tool, and your artistry lies in selecting the right tool for the job.
Key Takeaways: From Theory to Application
Let's distill the core principles we've covered into actionable takeaways. Mastering these concepts will elevate your work from simple snapshots to professional, intentional portraits.
- Light Tells a Story: The choice between hard and soft light, or between broad and short lighting, fundamentally alters the narrative of your image. A hard, direct light can convey strength and drama, while soft, diffused light creates a sense of openness and gentleness.
- Control is Paramount: Every successful headshot is a result of control. This includes managing the direction of your key light, the intensity of your fill light, and the separation created by a rim or hair light. Even when using natural window light, using reflectors and flags gives you command over the final result.
- The "Right" Setup is Client-Driven: There is no single "best" lighting setup for headshots. The ideal choice is always dictated by the subject's facial structure, the desired mood, and the ultimate use case for the image. A corporate LinkedIn profile requires a different feel than an actor's theatrical headshot.
Your Path Forward: Practice, Experiment, and Innovate
So, what are your next steps? The answer is simple: create. Set up your lights, or position a subject near a window, and start building these setups from memory. Photograph different people and see how the same lighting pattern interacts with unique facial features. Take notes on what works and what doesn't.
But in today's fast-paced digital landscape, mastery of physical setups is only half the equation. The demand for content is immense, requiring not just one perfect headshot, but dozens of variations for different platforms, campaigns, and A/B tests. This is where modern technology provides a powerful advantage.
Imagine taking one well-shot base image and instantly applying any of the eight lighting schemes we discussed. Picture generating hundreds of perfectly consistent, on-brand headshots for an entire team without a single complex lighting change. This fusion of foundational knowledge and AI-driven efficiency is the new frontier. By understanding the principles of classic lighting, you can more effectively guide AI tools to produce precisely the results you envision, scaling your creative output without sacrificing quality. This hybrid approach is your key to not just creating beautiful images, but building a scalable and efficient visual content strategy.
Ready to apply these professional lighting setups to your own photos instantly? Stop spending hours on physical setups and start creating endless, on-brand headshot variations in minutes. Explore how PhotoMaxi uses AI to relight your images, ensuring perfect consistency and professional quality for your entire team or brand.
Related Articles


Ready to Create Amazing AI Photos?
Join thousands of creators using PhotoMaxi to generate stunning AI-powered images and videos.
Get Started Free