A Guide to Creating Stunningly Realistic AI Photos
It's hard to believe how far AI-generated imagery has come. What started as abstract, often surreal art has evolved into something virtually indistinguishable from professional photography. We're talking about realistic AI photos—lifelike images created entirely by an algorithm, complete with authentic textures, subtle lighting, and believable human expressions.
This isn't just about applying a fancy filter. It’s about generating entirely new visuals from scratch, giving creators and businesses a ridiculously powerful tool.
The New Era of Digital Photorealism

The ability to create photorealistic AI images has completely changed the game for digital content. A few years ago, this was a niche experiment. Now, it's a practical way to get stunning visuals without the headaches and high costs of a traditional photoshoot. This massive leap is thanks to sophisticated diffusion models that have been trained on millions of real-world photographs, learning every nuance of light, shadow, and texture.
Instead of just imitating existing styles, today’s AI can build entirely new, photorealistic scenes from a simple text prompt. The implications are huge.
Why This Technology Matters Right Now
Let’s be honest: the demand for fresh, high-quality visual content is never-ending, and the old ways of creating it can be painfully slow and expensive. Realistic AI photos offer a powerful solution that delivers speed, flexibility, and unprecedented creative control.
For anyone creating content, this translates to tangible benefits:
- Cost Efficiency: You can slash the budget usually spent on photographers, models, location rentals, and gear.
- Creative Freedom: Dream up any concept you want. Need a product shot on a Martian landscape or a character portrait set in 1920s Paris? You can generate it in minutes.
- Speed and Scalability: Create a whole campaign’s worth of unique, on-brand images in a single afternoon, not over several weeks.
The market growth tells the same story. The global AI image enhancer market, valued at USD 2.6 billion, is expected to skyrocket to USD 50.7 billion by 2034. North America currently leads the charge with a 35.3% market share, showing just how quickly these tools are becoming indispensable. You can read more about this explosive growth on market.us.
The real magic here isn't just about replacing photoshoots. It's about opening up creative avenues that were completely inaccessible to most people because of budget or logistical barriers.
To get a clearer picture of what's involved, let's break down the key elements you need to master.
| Element | Description | Why It Matters for Realism |
|---|---|---|
| Source Images & Training | The quality and type of images you use as a reference or to train the AI model. | The AI can only be as good as its source material. High-quality inputs lead to high-quality, believable outputs. |
| Prompt Engineering | Crafting detailed and specific text descriptions to guide the AI's creation process. | Vague prompts create generic images. Precise prompts control every detail, from camera lens to mood. |
| Lighting & Pose Control | Techniques to precisely define the lighting conditions, shadows, and subject posture. | This is where realism is won or lost. Inconsistent lighting is the #1 giveaway of an AI-generated image. |
| Upscaling & Retouching | Using specialized tools to increase image resolution and fix minor imperfections. | Final polishing turns a good AI image into a flawless one, ready for professional use. |
This table outlines our roadmap. Mastering each of these areas is what separates amateurish results from truly professional-grade work.
Your Path to Creating Lifelike Images
This guide is your complete playbook for mastering AI photorealism. We’re going to move way beyond basic prompts and get into the specific, hands-on techniques that make all the difference. Throughout this walkthrough, we'll be using PhotoMaxi to show you a practical, repeatable workflow from start to finish.
For a broader look at the tools available, check out our guide on the best AI photo generator. Now, let’s get into the strategies that will take your images to the next level.
Mastering the Art of Prompt Engineering
If your source photos are the foundation, the prompt is the architectural blueprint. This is where you really get to play director, translating the image in your head into specific instructions the AI can follow. Getting past simple phrases like "a photo of a person" is the first real step toward creating images that can genuinely pass for a real photograph.
Think about it like you're on a real photoshoot. You wouldn't just tell a photographer, "take a picture." You'd talk about the mood, the lighting you're after, the specific lens, the expression on the model's face. That’s exactly how you should approach prompt engineering—the more detail you provide, the less room you leave for the AI to make weird, unwanted creative choices.
The Anatomy of a Powerful Prompt
A really solid prompt for photorealism usually has a few key ingredients. You can mix and match, of course, but thinking about it in layers is a great way to start and usually gets the best results.
Here’s a practical formula I often use:
- Start with the Core Subject: Nail down the most important element first. Describe the person or object, their key features, and what they're doing. (e.g., "An expressive portrait of a confident female CEO in her late 40s...")
- Build the Environment: Where is this happening? Describe the location, the time of day, even the weather. (e.g., "...in a modern corner office with floor-to-ceiling windows overlooking a rainy cityscape at dusk.")
- Add Photographic Specifics: This is the secret sauce for realism. Seriously. Mention camera models, lens types, aperture, and even film stocks. (e.g., "Shot on a Sony A7 IV, 85mm f/1.4 lens, ISO 100...")
- Define the Style: Guide the overall mood. Use terms a professional photographer would understand. (e.g., "...documentary style, cinematic lighting, high detail, sharp focus.")
This layered approach systematically builds the entire scene in the AI's "mind," which gives you a much more coherent and believable final image.
Going Granular with Textures and Materials
Vague words give you vague, plasticky results. The difference between "a man wearing a jacket" and "a man wearing a worn, cracked brown leather jacket" is absolutely massive. It's these specific details that sell the illusion.
Get comfortable using descriptive adjectives for everything you can see in your scene.
- Clothing: Instead of "shirt," try "crisp white linen button-down shirt with subtle wrinkles."
- Surfaces: Don't just say "table." Be specific: "polished dark mahogany table with a slight reflection."
- Skin: This is a big one. Add details like "natural skin texture with visible pores, subtle freckles."
These little micro-descriptions force the AI to render textures that feel like they belong in the real world, which is a huge part of creating realistic AI photos.
The best prompts I've written often read like a shot list from a film production. They're descriptive, precise, and obsessed with the tangible details that make a scene feel authentic.
Using Negative Prompts to Banish the "AI Look"
Telling the AI what you want is only half the battle. You also have to tell it what you don't want. This is where negative prompts become your best friend. They are your main tool for getting rid of those common digital artifacts that just scream "AI-generated."
So many AI images have that weirdly smooth, plastic-like skin, perfectly symmetrical features, or a digital sheen that gives the game away. Negative prompts help you steer the model clear of those defaults.
Here’s a go-to list of negative keywords I use to boost realism:
3d, cgi, render, digital art, illustration, cartoon, drawing, paintingdeformed, disfigured, mutated, ugly, blurry, duplicateplastic, smooth skin, airbrushed, oversaturated, fake
By explicitly telling the AI to avoid these things, you're pushing it toward a much more photographic and less artificial result. Just adding --(no) plastic, cgi, render to your prompt can instantly make a portrait feel more real. It's one of the simplest and most effective tricks in the book. Using a platform like PhotoMaxi makes this easy, as you can save your favorite negative prompt presets and apply them consistently across all your projects.
2. Sculpting Your Image with Light and Composition
If a great prompt is the script for your image, then lighting and composition are the cinematography. It’s what gives the scene its soul. Just like in real-world photography, the way light and shadow fall across a subject is probably the single biggest factor in making an AI-generated photo feel authentic and emotionally resonant.
Getting this right means moving beyond the flat, evenly-lit images that AI models often produce by default. You have to start thinking like a virtual director of photography. This involves intentionally placing light sources, defining their quality, and shaping shadows to create depth, mood, and focus.
The good news is that this level of control is more achievable than ever. Recent studies show AI models hitting an average photorealism benchmark of nearly 82%, a huge leap from just a couple of years ago. On top of that, over 74% of professional designers now feel that AI outputs are good enough to use without heavy editing, which says a lot about the tech's ability to handle tricky elements like light. You can find more details in these AI image generation statistics.
Mastering Professional Lighting Setups
To get genuinely realistic photos, you have to start thinking like a photographer. Instead of just adding "good lighting" to your prompt, get specific about the type of lighting setup you want to mimic. This gives the AI concrete, photographic language it can actually work with.
Here are a few classic lighting styles I use all the time and how to prompt for them:
- Rembrandt Lighting: This technique creates a distinct triangle of light on the cheek opposite the main light source. It’s perfect for dramatic, moody portraits. Try prompting:
dramatic Rembrandt lighting, single key light from the side, deep shadows. - Three-Point Lighting: This is the industry standard for a reason. It uses a key light, a fill light, and a backlight to perfectly shape a subject. Your prompt could be:
classic three-point lighting setup, soft key light at 45 degrees, subtle fill light, rim light separating subject from background. - Softbox Light: This mimics a large, diffused light source that wraps a subject in soft, flattering light with gentle shadows. It’s my go-to for clean beauty and product shots. A good prompt is:
lit by a large softbox just out of frame, soft diffused light, gentle shadows, clean and modern look.
The diagram below breaks down a simple but effective way to layer these kinds of details into your prompts.
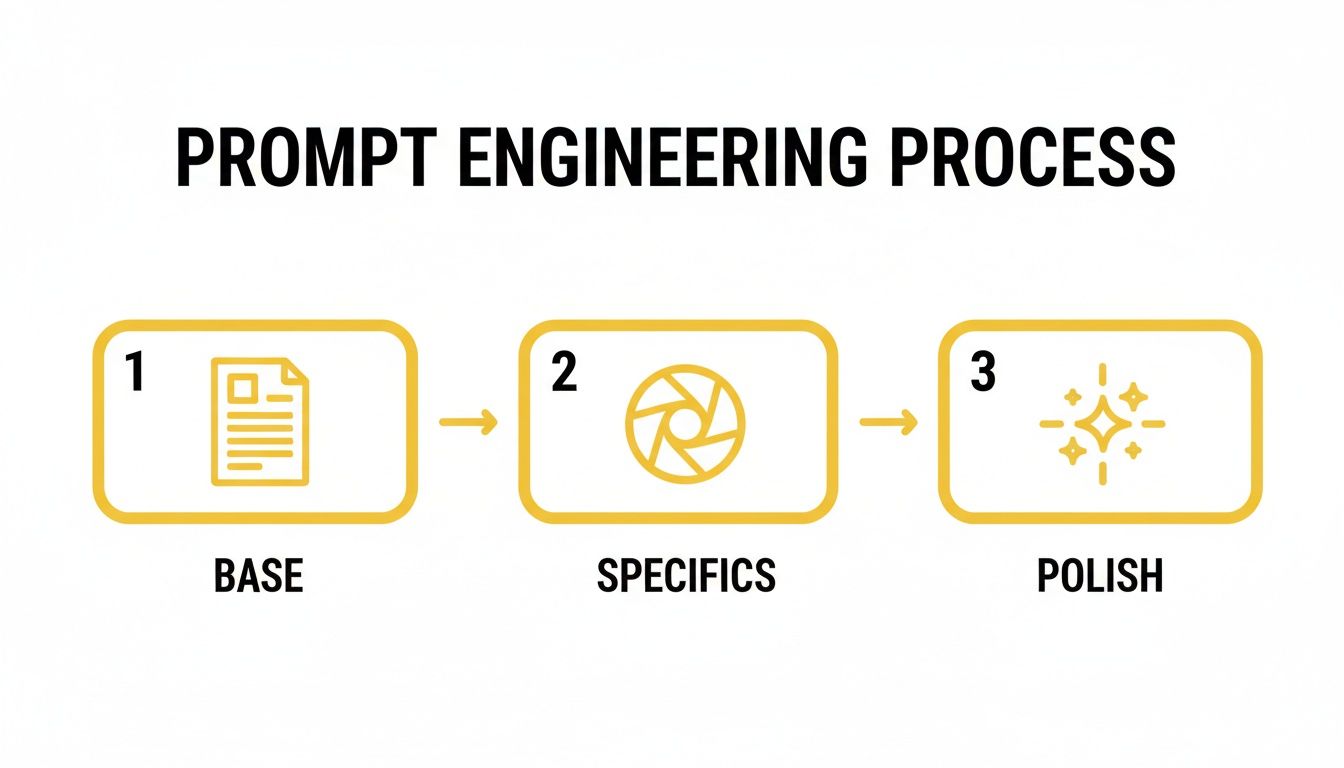
As you can see, the magic happens when you move from a basic idea to specific, polished instructions. That’s where you gain real control over advanced elements like lighting.
Beyond Lighting: Dynamic Composition and Posing
Once your lighting is dialed in, the next layer is composition. A subject standing perfectly still and centered in the frame almost always looks staged and fake. The best photos feel like they capture a moment in time, and you can create that feeling by carefully directing the pose and framing.
Instead of vague instructions, give the AI model clear directions for posture and action. Specificity is your best friend for avoiding that stiff, robotic look that plagues so many AI images.
My Pro Tip: Think in verbs. Don't just describe a person standing. Describe them leaning against a weathered brick wall, glancing back over their shoulder, or thoughtfully adjusting their cuff. Action implies a story, and that makes the final image feel much more alive.
Achieving a Natural Depth of Field
Another game-changer for realism is depth of field, the beautiful out-of-focus blur you see in the background of professional photos (often called bokeh). This effect makes your subject pop. In a real camera, this is controlled by the lens aperture, like using an f/1.4 setting for a very blurry background.
You can—and should—ask for this directly in your prompt. I've found that using camera-specific terms is one of the quickest ways to get a truly photographic look.
- For a creamy, blurred-out background:
shallow depth of field, beautiful bokeh, shot on an 85mm f/1.4 lens. - For a sharp, detailed scene:
deep depth of field, f/11, landscape photography, everything in sharp focus.
Using these terms signals to the AI that you're simulating the physics of a real camera lens, not just making a digital picture. It’s a small detail that makes a world of difference.
Creating Complex Scenes with Multiple People
Nailing a single portrait is one thing; creating a believable scene with multiple people interacting is a whole different beast. This is where a multi-model workflow, like the one in PhotoMaxi, becomes absolutely essential. If you try to generate two people interacting in a single prompt, you're just asking for weird artifacts and mangled limbs.
A much better approach is to generate each person separately against a simple background. Make sure their lighting is consistent, then use compositing tools to place them into a shared environment. It’s a bit more work, sure, but you get total control over their placement and interaction. The results are infinitely more coherent and believable, turning a simple image into a compelling story.
The Final Polish for Professional Results
Getting that first great image from the AI is a fantastic moment, but that’s rarely the end of the road. The real magic, the step that takes a good AI render and turns it into a professional, bulletproof asset, happens in post-production. This is where we hunt down and fix those tiny imperfections that scream "AI" and get the image ready for serious commercial use.
This isn't about slapping on heavy filters that make the image look even more artificial. Think of it more like the subtle touch-ups a professional photographer would do. We're talking minor flaw correction, enhancing key details, and ensuring the image is technically perfect for its final destination, whether it's a website banner or a high-resolution print.
Upscaling and Retouching for Flawless Realism
Most AI models will give you an image at a resolution that's fine for social media but won't cut it for print or large-format displays. This is where upscaling becomes your best friend. A quality AI upscaler, like the one built into PhotoMaxi, can boost your image resolution by 2x, 4x, or even 8x without the pixelated, artifact-ridden mess you’d get from older methods.
Once it's upscaled, it's time for a little digital plastic surgery. Even the best AI tools still have a few tell-tale weaknesses.
- Hands: The classic AI giveaway. You’ll often see extra fingers, missing fingers, or joints that bend in impossible ways. A careful touch with a liquefy or clone stamp tool can work wonders here.
- Eyes: Get in close and look for mismatched pupils, weird reflections, or a sclera (the white part) that looks too perfect and smooth. A few small tweaks can bring a portrait to life.
- Skin Texture: AI-generated skin can sometimes have a plastic-like sheen. Adding a very light layer of film grain or a subtle texture can restore that natural, organic feel.
Fixing these little details is absolutely crucial. For professional work, it's worth checking out tools that specialize in this. Our guide on the https://photomaxi.com/blog/best-ai-headshot-generator covers services that are particularly good at producing clean portraits right out of the gate.
Navigating the Legal and Commercial Landscape
Making a beautiful, realistic photo is one thing. Using it to make money is another conversation entirely, and you need to know the rules. The legal side of AI content is still being written, but some key principles are starting to take shape.
Copyright is the big one. The U.S. Copyright Office has been pretty clear that an image created entirely by AI with no significant human input can't be copyrighted. However, the work you put in—from crafting a detailed prompt to your post-production retouching—can potentially create a new work that is protectable.
Always, always read the terms of service of the platform you're using. PhotoMaxi, for example, grants full commercial usage rights on its higher-tier plans, which gives you the green light you need for business projects.
Model Licensing and Ethical Considerations
When you have a photo of a realistic-looking person, the idea of a "model release" gets a bit fuzzy. The person in your image doesn't exist, but their face was created from data trained on images of real people. To keep you out of legal hot water, reputable platforms like PhotoMaxi train their models on ethically sourced or fully licensed datasets. This ensures the faces you generate are commercially safe.
This ethical sourcing is quickly becoming a major dividing line in the industry. Just look at AI-generated fashion photography, a sector that has exploded into a USD 1.51 billion market and is projected to clear USD 6.12 billion in the next five years. You don't see that kind of rapid commercial adoption without a solid legal and ethical foundation. You can read more about this trend in the market forecast on natlawreview.com.
Ultimately, the final polish is about more than just pixels; it's about professionalism. When you combine technical fine-tuning with a solid understanding of your usage rights, you can use your AI photos anywhere with confidence. This is the due diligence that turns a fun creative experiment into a reliable professional tool.
Practical Workflows for Real-World Scenarios
Knowing the theory behind prompts and lighting is one thing, but stringing it all together into a repeatable process is where you really start seeing results. The secret is adapting your approach based on what you're trying to achieve, whether that's polished product shots, a dynamic ad campaign, or a personal creative project. Each goal demands a slightly different workflow to get those genuinely realistic AI photos.
Let's dive into how different professionals can use a tool like PhotoMaxi to build efficient, real-world workflows. We'll go from a simple idea to a finished, usable asset, giving you a clear blueprint to follow.
The E-commerce Brand Workflow
If you're running an e-commerce brand, your biggest headaches are probably consistency and diversity. You need to show your products on a variety of models in different settings, all without the astronomical cost and logistical nightmare of traditional photoshoots. An AI workflow tackles this problem head-on.
The mission here is to build a deep library of on-brand lifestyle images that feel completely authentic. It all starts with creating a consistent AI model or using a clean reference image of your product.
- Generate Your Base Model: First things first, use PhotoMaxi to create a core AI model that truly represents your target demographic. This is crucial for making sure the same "person" shows up across different shots, which builds brand recognition.
- Isolate Your Product: Take a high-quality photo of your actual product against a clean, white background. You'll drop this into your AI-generated scenes later on.
- Create Lifestyle Scenes: Now for the fun part. Start generating your lifestyle backdrops. Your prompts should focus on the environment and the action, not the product. For example:
A minimalist sunlit kitchen in the morning, soft light from a large window, warm and inviting, photorealistic, shot on a Canon EOS R5 with a 50mm f/1.8 lens. - Composite and Refine: Finally, bring it all together. Combine your real product photo with the AI-generated model and background. You'll need to use some basic editing tools to adjust shadows and lighting so the product looks like it truly belongs in the scene.
Using this method, you can spin up hundreds of variations for A/B testing ad creative or populating product pages with diverse, engaging visuals—all for a fraction of the usual cost.
A great way to get started is by thinking in formulas. Different goals require different prompt structures.
Sample Prompt Formulas for Different Scenarios
| Use Case | Core Subject and Action | Key Photographic Details (Lens, Lighting) | Style and Mood Keywords |
|---|---|---|---|
| E-commerce | A woman in her late 20s smiling, holding a ceramic mug | Shot on a Canon EOS R5 with an 85mm f/1.4 lens, soft morning light | Bright, airy, minimalist, clean, warm, cozy |
| Creative Portrait | Close-up portrait of a man with weathered features, looking away from camera | Shot on a Fujifilm X-T4 with a 35mm lens, dramatic Rembrandt lighting | Moody, cinematic, intense, textured, soulful, black and white |
| Advertising | A family laughing together on a picnic blanket in a park | Shot on a Sony A7 IV with a 24-70mm lens, golden hour sunlight, slight lens flare | Vibrant, authentic, joyful, aspirational, candid, energetic |
These formulas aren't rigid rules but starting points. Tweak and experiment with each component to dial in the exact look you need for your project.
The Marketing Agency Workflow
Agencies live and die by their ability to produce unique, attention-grabbing visuals that perfectly match a client's brand. The AI workflow here is all about rapid iteration and creative exploration, helping you get from a rough concept to a polished campaign image in record time.
In an agency environment, you need to brainstorm, pitch, and execute—fast. AI puts that entire cycle into overdrive.
A successful agency workflow isn't just about making one perfect image. It’s about generating dozens of high-quality options to present to a client, allowing for collaborative feedback and rapid adjustments without booking a single reshoot.
The process often kicks off with building a visual mood board. From there, you translate that feeling into specific, detailed prompts to generate a set of initial concepts. Once the client approves a direction, you can refine the winning concept into a final, high-resolution asset, complete with post-production touch-ups for that perfect finish. This is where you can explore how an AI profile picture generator can quickly create character concepts for campaigns.
The Individual Creator Workflow
For photographers, artists, and solo creators, AI unlocks entirely new ways to express yourself. In this case, the workflow is less about commercial consistency and more about augmenting your artistic vision. You can produce stunning conceptual art or even build a portfolio of realistic stock photography to license.
A typical creative workflow might look like this:
- Start with an Idea: Kick things off with a core theme or emotion. Use broad, artistic prompts to generate a whole series of inspirational images to get the juices flowing.
- Refine and Iterate: Pick out the strongest concepts and start honing them. Tweak your prompts to adjust the lighting, composition, and mood until the image perfectly matches what's in your head.
- Add Your Final Touch: Import the best generations into your favorite editing software like Photoshop or Lightroom. This is where you apply your signature color grading, fix any minor AI artifacts, and add that final human touch that makes the work uniquely yours.
This approach transforms AI from a simple image generator into a true creative partner. It helps you bring ambitious ideas to life that might have been impossible to shoot traditionally because of budget or location constraints.
Answering Your Top Questions About Realistic AI Photos
Even with the best tools, you’re bound to hit a few snags or have questions pop up as you dive into creating AI photos. Getting ahead of these common hurdles is the secret to a fast, frustration-free workflow. Here are the questions I hear most often from other creators.
"How Do I Get Realistic Faces and Hands?"
Ah, the classic AI challenge. This is, without a doubt, the biggest struggle for anyone starting out. AI models are notorious for mangling hands, and faces can easily fall into the "uncanny valley." The fix always comes down to a combination of smart prompting and knowing when to use your editing tools.
When it comes to faces, you need to think like a photographer. Go beyond just age and ethnicity. Prompt for things like "sharp focus on the eyes" or "natural skin texture with visible pores." These details tell the AI you want true realism, not a smoothed-over digital rendering. At the same time, use negative prompts to actively steer it away from junk—think plastic, cartoon, 3d render, blurry.
Hands are a similar beast, but they require a slightly different approach.
- Be Specific About the Action: Don't just ask for "hands." Describe what they are doing. Is a "hand gently resting on a wooden table" or are the "fingers loosely gripping a steering wheel"? Context is everything.
- Generate in Batches: Never settle for the first image. I always generate a batch of 5-10 images at a time. This massively increases the chances of getting at least one or two options with perfectly formed hands.
- Embrace Inpainting: If you get an image that's 95% perfect but has a wonky finger, don't throw it out. Tools like the inpainting feature in PhotoMaxi are your best friend here. Just mask the problem area and let the AI regenerate only that tiny section until it's flawless.
"What's the Deal with Copyright and Commercial Use?"
The legal side of AI imagery can feel like a gray area, but the rules are getting clearer. Generally, the images you generate can be used commercially, but who owns the "copyright" is complicated. The U.S. Copyright Office, for example, has stated that works made entirely by an AI without significant human input can't be copyrighted.
But here's the key: your creative input makes a huge difference. The carefully crafted prompt, your unique composition choices, and any post-production editing you do all add a layer of human authorship that can be protected.
The golden rule here is simple: always check the terms of service of the AI platform you're using. The terms will spell out exactly what you can and can't do. Professional-grade platforms will explicitly grant you a commercial license, so you can confidently use your images for your business.
"Which AI Models Are Actually the Best for Photorealism?"
Not all AI models are created equal. They each have their own artistic biases and strengths.
For pure, unadulterated photorealism, models built on the Stable Diffusion architecture are tough to beat. Fine-tuned versions like Realistic Vision are widely considered the gold standard because they’re incredible at rendering lifelike textures, lighting, and fine details.
Midjourney is another powerhouse, celebrated for its artistic flair. It produces breathtakingly realistic images, but they often have a cinematic or slightly stylized quality. This can be a massive plus for certain creative projects but might not be what you want for a straightforward product shot. DALL-E 3 is amazing at understanding complex prompts but sometimes needs a little more coaxing to achieve that pure photographic look.
My best advice? Don't lock yourself into one model. Experiment. A great platform will give you access to several models optimized for realism, letting you pick the right engine for the specific job at hand.
Ready to stop troubleshooting and start creating? PhotoMaxi bundles everything you need—from advanced prompt controls to one-click upscaling and inpainting—to produce flawless, commercially-ready realistic AI photos in minutes. Start generating with PhotoMaxi today!
Related Articles


Ready to Create Amazing AI Photos?
Join thousands of creators using PhotoMaxi to generate stunning AI-powered images and videos.
Get Started Free