Remove Objects From Photos AI A Pro Guide to Flawless Edits
Getting rid of unwanted objects in your photos used to be a real headache. Now, you can just paint over an element you don't want, and AI-powered software makes it vanish by intelligently rebuilding the background. This whole process is called generative inpainting, and it’s completely changed the game, turning what was once a painstaking chore into something you can do in seconds.
The New Era of AI Photo Editing
It wasn’t long ago that removing a photobomber or a stray power line meant hours of meticulous work with tools like the Clone Stamp in Photoshop. You needed a steady hand, a good eye, and a lot of patience. Even then, the results often looked a bit... off.
Today, that world feels a million miles away. AI has completely democratized photo editing, giving anyone the power to get clean, professional-looking results without needing to be a Photoshop wizard. This isn't just about making things easier; it fundamentally changes how we think about creating and perfecting our images.
An e-commerce owner can now clean up product shots on the fly instead of booking another expensive photoshoot. A travel blogger can erase a distracting piece of trash from an otherwise perfect beach photo in an instant.
Why AI Object Removal Is a Game-Changer
The real magic here is generative inpainting. When you mark something for removal, the AI does more than just blur or copy nearby pixels. It actually understands the context of the photo—the textures, the lighting, the patterns—and generates brand-new pixels to fill the space. That's how it can convincingly recreate a brick wall or a patch of grass without leaving a trace.
This powerful capability is driving huge growth in the industry. The AI photo editing market hit a value of USD 1,444.62 million in 2024 and is expected to grow at an impressive 15.50% each year. This boom is all about the demand for smart tools that take the grunt work out of editing and give creators their time back.
Key Takeaway: AI object removal is more than a delete button. It’s about giving you full creative control, speeding up your workflow, and making sure your final images are polished and distraction-free.
What You Will Master in This Guide
In this guide, we're going to get our hands dirty. We'll walk through a practical workflow, showing you exactly how to prep your photos, pick the best tools, and master masking to remove objects from photos with AI like a pro.
We’ll cover real-world situations, including:
- Product Photography: Getting those clean, consistent shots that look great in an online store.
- Portrait Editing: Removing small blemishes or clearing clutter from the background.
- Landscape Shots: Erasing other tourists or cars to capture that perfect, unspoiled scene.
By the end, you'll have a solid new skill in your creative toolkit. If you're curious about how AI is shaking up the broader world of picture-taking, check out our guide on AI for photography.
My Go-To Workflow for Flawless AI Object Removal
Getting a clean, undetectable edit when removing something from a photo isn't just about clicking a button. It’s more of a craft. Over the years, I've developed a methodical workflow that sets the AI up for success, ensuring professional results whether I'm cleaning up product shots or perfecting a landscape.
The process really starts before you even touch the removal tool and ends with a few subtle, final adjustments. Each stage is crucial for guiding the AI to generate a fill that isn't just plausible, but completely invisible to the naked eye.
Let's walk through the key phases I follow every time.
Prep Your Image Before You Start
The old saying "garbage in, garbage out" has never been more true than with AI tools. The quality of your starting image directly dictates the quality of the AI's final output. A few simple prep steps can dramatically improve your results and save you a ton of frustration later on.
Always, and I mean always, start with the highest resolution file you have. When an AI rebuilds part of a photo, it's sampling the surrounding pixels for information. More data means a sharper, more detailed, and far more convincing fill. Trying to work with a low-quality, compressed JPEG is like asking a master painter to work with a muddy, limited palette—you're just not going to get a masterpiece.
Beyond just resolution, I like to do some basic lighting and color tweaks first. If the object you're removing is sitting in a deep shadow, the AI might get confused about the lighting in that spot. A quick lift of the shadows in your raw editor can give the algorithm much more information to work with, leading to a far more natural-looking patch.
Master the Art of the Mask
The mask is your direct line of communication with the AI. It tells the tool exactly what to remove and, just as importantly, what to leave alone. Getting this right is everything.
A sloppy mask that bleeds into the background you want to keep will just confuse the AI. On the flip side, a mask that's too tight and leaves a faint outline of the object—what we often call a "ghosting" artifact—is a dead giveaway that the image has been manipulated.
For the best results, here’s what I do:
- Zoom In. Way In. Get right up close to the object so you can see every pixel along its edge. Don't even think about trying to draw a perfect mask from a fully zoomed-out view.
- Vary Your Brush Size. I use a larger brush for the main body of the object and then switch to a smaller, more precise brush for the detailed edges.
- Feather the Edges (Just a Hair). Some of the more advanced tools let you feather or soften the mask's edge. A tiny bit of softness—just a pixel or two—helps the AI-generated fill blend more naturally into the scene.
Think of your mask like a surgical incision. The cleaner and more precise it is, the less scarring you'll have. A tight, accurate selection is probably the single most important factor in a successful object removal.
Guide the AI for a More Natural Fill
Once you've nailed the mask, the inpainting process kicks off. This is where the magic happens—the AI analyzes the surrounding area and generates new pixels to fill the void. While it's mostly automated, you're not just a passenger. You can still steer.
Many modern tools, like Adobe Photoshop's Generative Fill, let you add a text prompt to guide the replacement. Let's say you're removing a person standing on a cobblestone street. You could add a prompt like "cobblestone street with morning light" to give the AI specific context. This little bit of direction helps it avoid creating a generic, mismatched texture.
This is a game-changer for complex backgrounds. If you remove a car from a gravel driveway without a prompt, the AI might just generate a blurry brown patch. But with a prompt like "detailed gravel and dirt texture," you can guide it toward creating a much more realistic surface. It’s all about giving the AI a clear creative brief.
The Final Polish: Quality Control
The last step is to get your magnifying glass out and scrutinize the edit. The AI gets you 95% of the way there, but your final polish is what makes it perfect.
Zoom in and inspect the edited area from different angles. I'm always on the lookout for these tell-tale signs of a quick-and-dirty edit:
- Texture Mismatches: Does the new patch look too smooth or blurry compared to the grain and texture of the original image?
- Lighting Inconsistencies: Is the filled area a tiny bit brighter or darker than its immediate surroundings?
- Pattern Repetition: Did the AI get lazy and create an unnatural, repeating pattern when trying to replicate something like wood grain or fabric?
This is where I turn to my classic tools—the healing brush, the clone stamp, or a local brightness adjustment layer. A tiny bit of added grain or a subtle shadow can make all the difference, seamlessly integrating the AI’s work into the original photograph.
Choosing Your Ideal AI Object Removal Tool
Let's get one thing straight: not all AI object removal tools are created equal. The right one for you really depends on what you're trying to accomplish. A Shopify merchant trying to clean up product photos has vastly different needs than a filmmaker tidying up a frame.
To find your perfect match, you have to look past the flashy "one-click fix" marketing. It all comes down to the core technology. You need to think about a few key things: how precise is the masking? How smart is the inpainting (the part that fills in the gap)? And how well does it fit into your existing workflow?
Mobile Apps vs. Desktop Software
For quick, on-the-go edits, mobile apps like TouchRetouch are fantastic. They’re brilliant for simple jobs, like getting rid of a tourist who wandered into your otherwise perfect vacation shot. Their whole purpose is speed and simplicity, letting you fix things right on your phone.
But for professional-grade work, you'll almost always want to be on a desktop. Software like Adobe Photoshop gives you an incredible amount of control. You can fine-tune your masks, work non-destructively in layers, and carefully blend the AI-generated fill with the surrounding textures. It’s a much more deliberate and refined process.
Pro Tip: Don't just focus on the removal feature itself. Think about the whole picture. An AI tool that’s already built into a platform you use daily, like PhotoMaxi or Lightroom, is a game-changer. It saves you the hassle of exporting and re-importing files, which not only saves time but also helps preserve your image quality.
This simple diagram breaks down the basic workflow for any AI-powered edit. It's not just about hitting a button; it's a three-stage process.
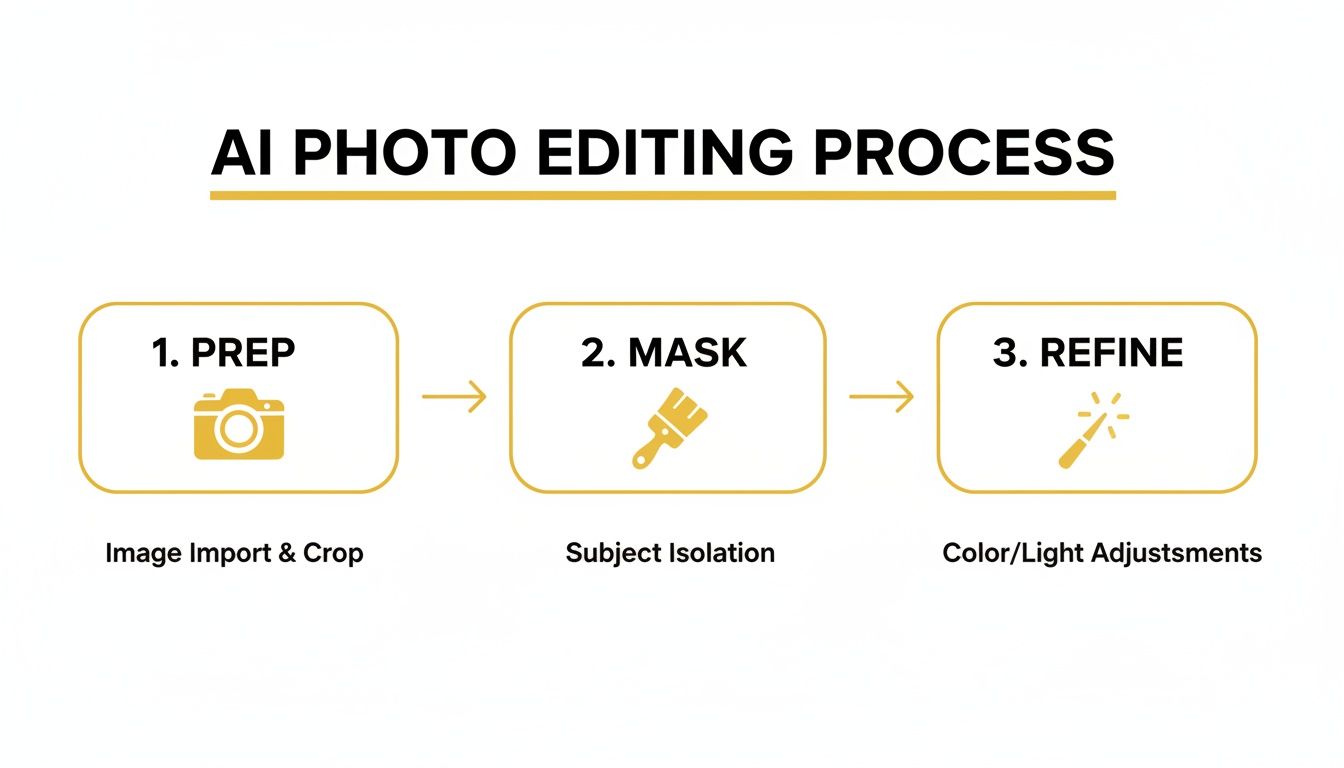
As you can see, getting a great result starts long before the AI does its magic. It's all about prepping the image and making a clean, accurate mask.
To help you navigate the options, here's a quick comparison of the different types of tools available.
AI Object Removal Tool Comparison
| Tool Type | Ideal For | Key Strengths | Potential Limitations |
|---|---|---|---|
| Mobile Apps | Social media, casual users, quick fixes | Convenience, speed, user-friendly interface | Limited precision, fewer advanced controls |
| Desktop Software | Professionals, high-res photos, complex edits | Granular control, layer-based workflow, high quality | Steeper learning curve, requires more powerful hardware |
| Web-Based Tools | One-off tasks, users without powerful computers | Accessibility, no installation needed | Often subscription-based, potential privacy concerns |
| Integrated Plugins | Photographers, designers, agencies | Seamless workflow, batch processing, consistency | Tied to a specific host application (e.g., Photoshop) |
This table should give you a starting point. Think about the kind of work you do most often and which category aligns best with your needs.
Considerations For E-commerce And Agencies
When you're working in a commercial setting, the stakes are obviously higher. For e-commerce and product photography, AI object removal is a massive deal—this market is projected to reach USD 8.9 billion by 2034. The ability to instantly zap props, clean up reflections, or standardize backgrounds is essential for a polished and consistent product catalog. Photoroom's blog has some great stats on the market impact if you want to dive deeper.
If you're an agency or a brand managing hundreds of product shots, one feature becomes non-negotiable: batch processing. Being able to apply the same removal settings across an entire photoshoot saves an unbelievable amount of time. This is where integrated platforms really shine, which helps explain why enterprises currently make up 42% of the market share for spending on this tech.
And if your work involves not just editing but also creating visuals from the ground up, take a look at our list of the best AI photo generator tools. You’ll see how these technologies can work together in a modern creative pipeline.
Ultimately, the best tool is the one that fits your workflow, not one that forces you to change it. My advice? Try a few out. See which one feels right and consistently delivers the high-quality results you need for your specific kind of work.
Troubleshooting Common AI Editing Flaws
Even the best AI tools can throw you a curveball. The technology is amazing, but it’s not magic. You’ll inevitably run into weird results—a blurry patch where a sharp object used to be, a texture that looks completely alien, or lighting that just feels off.
When an edit goes sideways, resist the urge to just hit "undo" and start over. Take a second to figure out what went wrong. Most AI artifacts aren't random; they're predictable responses to specific challenges in your image or the instructions you gave. Understanding the why behind a bad result is the secret to fixing it.
For instance, a soft, blurry fill usually means the AI didn't have enough clear data to work with. This can happen with a low-resolution photo or a really complex background that confused the algorithm.
Diagnosing Blurry or Unnatural Textures
One of the most common frustrations is when the AI replaces an object with a smooth, textureless blob. This is a classic problem on surfaces like grass, fabric, or wood grain, where the pattern is complex. The AI gives up on replicating the fine details and just defaults to an averaged-out, smudgy fill.
More often than not, the root cause is one of two things:
- A sloppy mask: If your selection bleeds even slightly into the surrounding detailed area, you’re feeding the AI mixed signals.
- Not enough context: When removing something from a large, uniform texture, the AI might not have enough varied information from the edges to rebuild the pattern convincingly.
The fix? Start by tightening your mask so it perfectly hugs the object's boundary. If that doesn't solve it, try a multi-pass approach. Remove a small chunk of the object first, let the AI fill it, and then work on the rest. This gives the AI more high-quality background to sample from with each pass.
Correcting Mismatched Lighting and Shadows
Another dead giveaway of an AI edit is when the lighting is wrong. Maybe you removed a person standing in the sun, but the AI filled the space with a patch that's noticeably darker or completely forgot the subtle shadow they were casting. The algorithm tries its best to analyze ambient light, but it can easily miss the mark.
The most convincing edits are the ones where the light behaves as you'd expect. If you remove an object, you also have to deal with its shadow or any light it was bouncing onto nearby surfaces.
Look really closely at the edited spot. Does the brightness and color temperature match the surrounding pixels? Usually, a tiny nudge is all it takes. Grab a local adjustment brush in your editor and slightly brighten or darken the patch. Sometimes, adding a very faint, soft-edged shadow where one would naturally fall is the final touch that makes the whole edit click.
Think of it as giving the AI a final, human assist. You’re not redoing its work—you’re just blending it seamlessly into the scene. This final 5% of effort is what separates a decent result from an invisible one.
Creative Uses for AI Object Removal
Sure, AI object removal is great for getting rid of photobombers or cleaning up a stray piece of trash. But that’s just scratching the surface. The real magic happens when you stop thinking of it as just an eraser and start seeing it as a powerful creative instrument.
This is your chance to art-direct reality long after the shutter clicks. You can dial down the chaos of a busy street scene to create a sense of calm, or completely repurpose a photo for a new context. This is how you remove objects from photos with AI to tell a better story.
De-Branding for Authentic Campaigns
Here’s a common headache for marketers: you find the perfect user-generated photo for a campaign, but there’s a competitor's logo on someone’s shirt. Or maybe it’s a great stock photo ruined by a generic, fake brand on a coffee cup. Not long ago, that image would have been a non-starter.
Now, you can just wipe those logos and brand marks away. In seconds, the image becomes usable, opening up a huge library of authentic, real-world content for your brand. It saves a ton of money on custom photoshoots and lets you maintain a clean aesthetic without sacrificing authenticity.
By removing distracting logos or text, you place the focus squarely on the human element and the story you're trying to tell. It’s an essential skill for modern marketers looking to blend authenticity with brand control.
Minimalist Art and Architectural Focus
For photographers and designers, this is where things get really fun. Imagine you’ve captured a striking piece of architecture, but the shot is cluttered with power lines, traffic signs, or pedestrians. With AI, you can meticulously remove every last distraction.
This process isolates your subject, drawing the eye to its form, texture, and the play of light across its surfaces. What you're left with is a clean, powerful composition that feels deliberate and impactful. You're essentially creating an idealized, hyper-realistic version of the scene, and it's a technique that pairs well with the concepts in our guide to creating more realistic AI photos.
Creating Clean Plates for Video
In video production and visual effects, a "clean plate" is a lifesaver. It’s simply a shot of the background with no actors or moving objects in it, which is essential for all sorts of post-production magic. Traditionally, this meant filming the scene empty, but that's not always possible.
AI object removal changes the game. You can now pull a single still frame from your footage, erase the actors and any other moving elements, and let the AI generate a perfect background. This clean plate becomes a canvas for VFX artists, allowing them to layer in effects or seamlessly remove unwanted elements from the final video.
Got Questions About AI Object Removal?
Even with the best tools on the market, you'll likely run into a few head-scratchers when you first start to remove objects from photos with AI. The tech is powerful, but a little inside knowledge goes a long way toward getting those flawless, professional results every single time. Here are some answers to the questions I hear most often.
What About Really Complex Backgrounds?
Yes, absolutely. Modern AI is surprisingly adept at reconstructing detailed backgrounds—think brick walls, dense foliage, or even patterned fabrics. Its success really hinges on the quality of its inpainting algorithm, which samples the surrounding pixels to generate a fill that looks like it was always there. The trick is to give the AI good data to work with.
For these tough cases, a precise mask is your best friend. Make sure your selection hugs the object's edges tightly, without bleeding over into the background you want to keep. I've also found that a two-step process can work wonders: remove the main part of the object first, let the AI do its thing, and then go back in for a second pass to clean up any tricky leftover bits.
Will Using AI Reduce My Image Quality?
Not if you're using a quality tool. If your final image comes out looking fuzzy or pixelated, the culprit is almost always a low-resolution source file. The AI needs as much pixel data as it can get to properly analyze and rebuild the area.
To keep everything looking sharp:
- Always, always start with the original, high-resolution photo.
- Steer clear of heavily compressed JPEGs if you have other options like RAW or TIFF.
- When you’re finished, export using high-quality settings (like a 90%+ quality JPG or a lossless format like PNG) to preserve all that detail.
How Can I Fix Weird Lighting After Removing Something?
This is a classic problem, especially when the object you removed was casting a shadow or reflecting light onto nearby surfaces. The best AI platforms, like PhotoMaxi, do a pretty good job of analyzing the scene's lighting and trying to match it, but a final human touch often makes the difference between "good" and "perfect."
Once the object is gone, zoom right in and give the patched area a close look. You're hunting for subtle mismatches in brightness, color, or shadows. Even a slight inconsistency is a dead giveaway that the image has been edited.
Most of the time, a quick, local adjustment is all you need. Grab a brush tool in your editor and gently dodge (lighten) or burn (darken) the spot. Sometimes, adding back a very soft, faint shadow where one would naturally be can make the entire edit completely invisible, selling the illusion perfectly.
Ready to stop cleaning up photos and start creating flawless content in seconds? PhotoMaxi lets you generate studio-quality shots, remove unwanted objects, and produce on-brand visual sets without the hassle. Transform your creative workflow today. Discover what's possible with PhotoMaxi.
Related Articles


Ready to Create Amazing AI Photos?
Join thousands of creators using PhotoMaxi to generate stunning AI-powered images and videos.
Get Started Free